Tuesday, March 6, 2012

Painting Penny's Room

Like I said before, picking a flippin' paint colour is difficult! For weeks we had at least 10 paint chips taped up on the wall in the white, pink and orangey-coral family; there was even a couple of aqua chips, just for something different but Mr. Loonie did not want it feeling like a hospital :/. We checked out how the colours looked in all possible lighting conditions....sunny, cloudy, morning, afternoon, evening, lamp on, lamp off, etc. I knew I wanted the room bright and fresh but I didn't like any of the whites or light coloured samples we had so you know what I did? I went down to Rona, grabbed a book of whites and picked the colour which looked the most white to me. So yah, after all that I just went and picked a colour from a book.....craaaaazy! Luckily, it all worked out...

Mr. Loonie patched, sanded and primed the walls before the new colour went up. The before colour was a mauvy purple (it looks really light in the below photo to the left - have a look at this post which shows a better representation of the purple).


BEFORE SHOTS:


AFTER SHOTS:

I chose Refreshing White from Rona's Expressions line, it ended up having a pink tinge to it allowing the dressers and trim to have some contrast against the wall. To clean up the baseboards and trim I did a quick coat using just basic white straight from the can. 


The closet also had a makeover since the doors were already out for the frosting project. The shelf was a wood veneer/ particle board combo and the plastic brackets had aged an ancient yellow.  Mr. Loonie tried taking out the shelf but it was not moving out of its 30 year home; the years of paint had sealed it in tight.  We ended up protecting the walls with newspaper flyers and spray painting it all a clean white.


Now to get the last bit of trim up around the door and the frosted closet doors in (the 2nd method worked - post coming soon!) 
Ooooh.....the crib and rocking chair (both Kijiji finds) were delivered this weekend by Loonie family members after a Edmonton weekend trip. They are amazing!

Saturday, March 3, 2012

Yummy Things from a Can Part 1: Dulce de Leche

"Literally translated, dulce de leche means sweet of milk."* It is popular in Latin America as a sweet desert made from slowly simmering sweetened milk resulting in a golden milky caramel which can be used for topping ice cream, cake, cheesecake, etc!  Yumm!
The following is the easy way of making it rather than slaving over a hot stove trying not to burn the milk.....we all now how that turns out.  You have to try this, you will be amazed at how delicious it really is!!


STEP 1: Peel the label off your can of sweetened condensed milk. You don't want to be cleaning up paper bits in the pot.


STEP 2: Place the can in a pot under at least 1" of water.  You do not want the water level to drop below this as your can will explode leaving you and/or your kitchen covered in hot caramel lava.  I had the stove set on 4, just a low simmer.


STEP 3: Simmer between 2 and 3 hours.  2 hours for a more runny milky sauce, 3 hours for a thick golden caramel sauce which is what I did.


STEP 4:  Be careful when opening the can, it is very hot!! It may be wise to wait a few minutes, I was not so smart :(

STEP 5: Use to top your favourite desert and enjoy!


*source

Thursday, March 1, 2012

Frosting Mirrored Closet Doors: 1st Attempt = FAIL

So I have this great idea, it's just figuring out how to execute it.  Penny's room has two giant mirrored closet doors.  It was great when the room was used as my "getting ready room"/walk-in closet because when I did look in those mirrors it was after at least 20min of primping. It will NOT be the same case when Penny arrives. Those mirrors will only show a 3am monster looking back at me, a monster covered in poop, pee, spit-up, milk and who knows what else.  So I need to provide myself with some protection: a shield of frost!

The plan to continue the polka-dot theme as it would still allow for some reflection (I can't wait until she starts recognizing herself...oh the excitement!).  My first idea was to cut out 6 different sized circles into a plastic sheet (report covers) using things found around the office to trace and an x-acto knife to cut out. I would hold a stencil sheet one at a time to the closet door and spray, moving around the door with the different sized stencils to create a random pattern. 


Note: I marked off 1" and 2" increments around the stencil to assist in spacing.  Obviously it wasn't needed.


I thought the over-spray wouldn't extend past the sheet and the static cling from the plastic would stay close enough to the mirror.......WRONG! As you can see, from the picture below it was an epic fail.  The "wind" created by the spray blew the sheet up and the over-spray was too much for these little sheets especially for the bigger circles.  I tried to spray closer for the smaller circles but that just led to drippage.  I cleaned this mess up with a little paint thinner and a razor blade.


On to Plan B....stay tuned!

Wednesday, February 29, 2012

Turnip Fries

Around these parts, the first Tuesday of the month is 15% off at all the grocery stores, a day two cheapskates never miss! This big monthly grocery shop is tackled by Mr. Loonie because he works shift and is usually off during the day (evening shopping on this day is insane!).  He usually sticks to the list but always comes home with a few surprises.  This month his surprises included two tubs of chocolate-banana ice cream (apparently it was on clearance - I swear it wasn't on the list...) and a turnip. WTF do I do with a big ass turnip?  I have been struggling with this question for over 20 days until a little google search came up with Turnip fries.....why of course!!!

Turnip Fries (Adapted from allrecipes.com)
  • 1 medium turnip, cut into equal sized sticks
  • Drizzle of Olive Oil
  • Your choice of seasonings (I used sea salt, garlic and onion powder)
  • Preheat the oven to 400
  1. Toss the turnip sticks in with the oil and seasonings.
  2. Lay the turnip sticks evenly spaced on a cookie sheet.
  3. Bake for 20-30 minutes, checking after 15 minutes.


Now you can't eat any type of fry without a dipping sauce, can you!? No!  I made a quick curry mayo...just mayo and curry.  Curry mishap in the process........


Now I will have to admit, these sounded good, tasted good and looked good but they just lacked the crispiness fries need! So if you want an option for turnips this will suit you well.  If you are craving a crispy fry, I'd take a pass on the turnips and bake some regular ol' potato fries!


Tuesday, February 28, 2012

The Adventures of Stryker - February 28, 2012

So my lovely Stryker decided to run away on our walk tonight - this is not uncommon; Mr. Loonie even has a tracker made up for him using an old iphone, ipod arm band and dog harness.  Tonight, I decided he wouldn't need it because we were only going to go on a little walk.  Well was I wrong, he sniffed out a treat only a few minutes from our house and went running.  This is what he came home with an hour later.....


Update (March 1, 2012):  Mr.Loonie took the head on a walk yesterday morning and left him hanging in a tree.  Hopefully the birds and the worms clean him up nice so we can pick him up in the sping to hang in our yard.  Reminder to self: Use this website to identify poor deery boy's age: http://www.timberwolfinformation.org/info/deerjaw/basics.htm

Monday, February 27, 2012

Lining Penny's Drawers

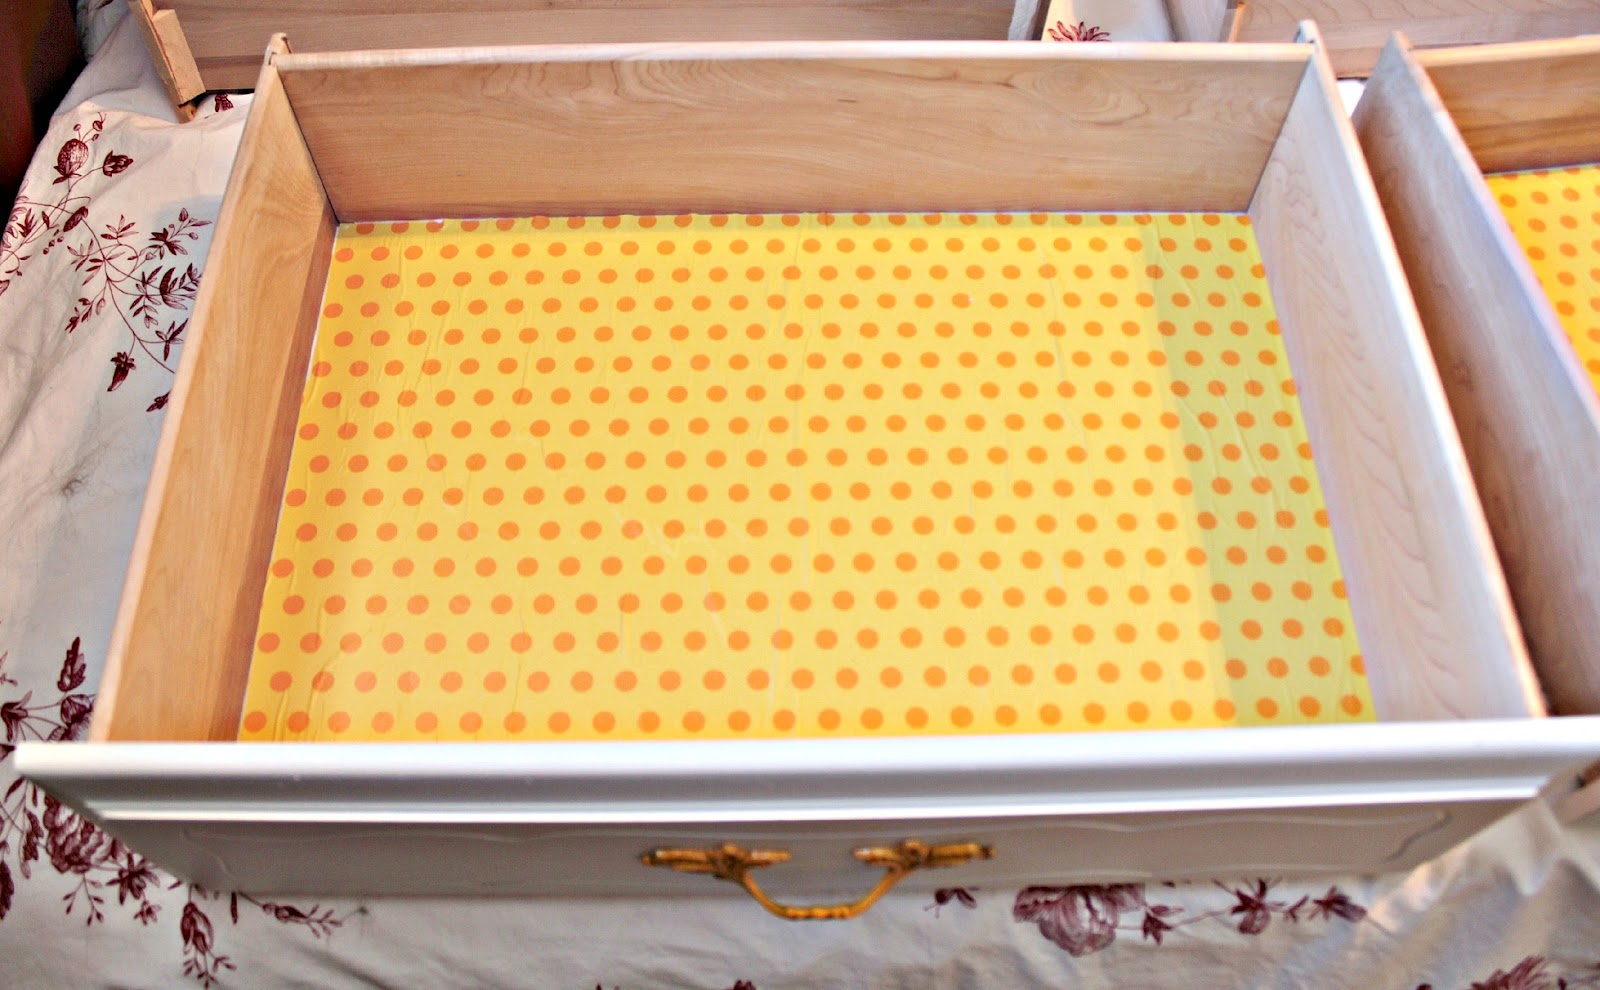
My favorite decorating blog that I have been reading for years and still check on a daily basis is Young House Love. They have turned their love of DIY, design and blogging into a full time career, I would envy them but their lives recently turned crazy busy with a little girl and a book deal. For their baby girl's room they too refinished a dresser but then continued to pimp it out by lining the dresser drawers in adorable craft paper.  I followed their tutorial to do the same.  Unlike them I used cheap ass wrapping paper from the dollar store instead of heavy weight craft paper because I couldn't resist the orange and yellow polka dots that looked like it was destined to line the drawers.  I did end up with quite a bit of wrinkles in the paper even with my best attempts to smooth it out. At first I got frustrated but decided to carry on, Penny will know they were made with love.

STEP 1: Wash drawers out, they were full of dust from sanding.

STEP 2: Cut paper to size.  Mr.Loonie had the smart idea of cutting the paper rolls to the width of the drawers so all I had to do was unravel the length needed into the drawer and cut with an x-acto knife.

STEP 3: Apply a thin layer of Matte Modge Podge (available at Wal-Mart) using a foam brush.

STEP 4: Lay down paper starting at one end and smooth out the best you can using whatever tool that works. (Sorry for the shit instructions here, I have yet to master it).  Let dry overnight.

STEP 5: Apply another thin layer of Modge Podge on top of the paper (I did 2 coats).


FINISHED PHOTOS:


Oh Bella....Y U SO CURIOUS?!?