Showing posts with label DIY. Show all posts

Saturday, June 15, 2013

Surprise Wood

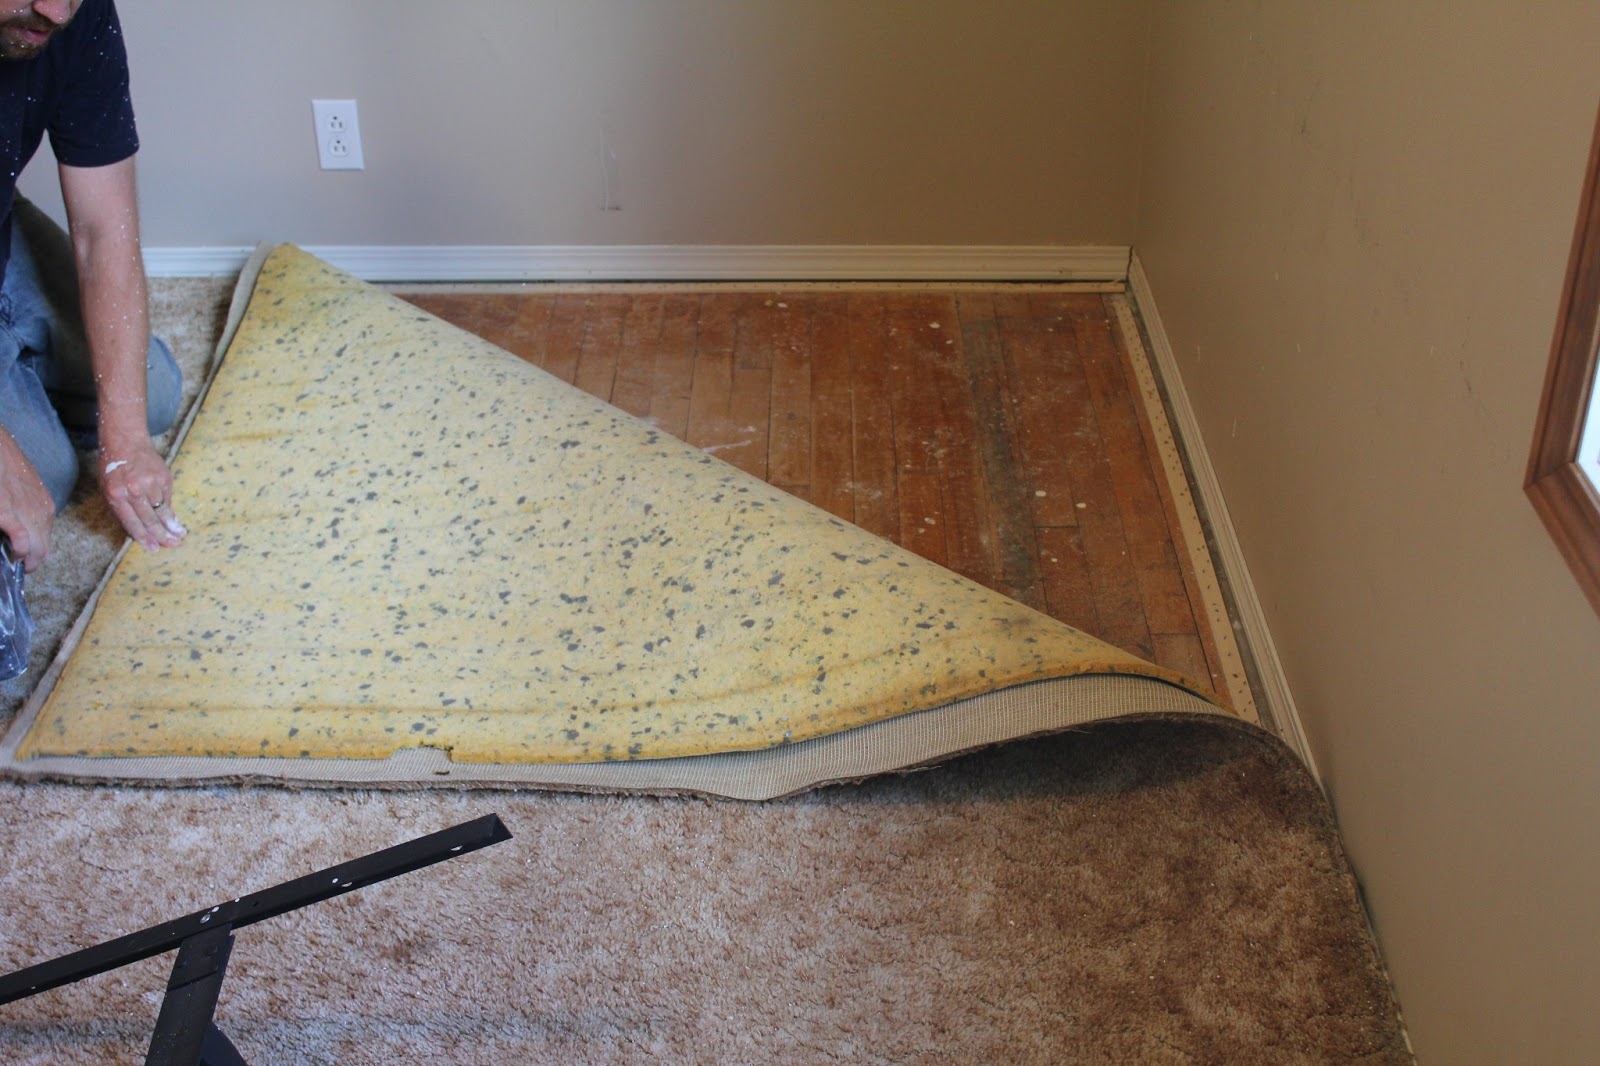
HA! Tricked you ladies, unfortunately this post is not about pop-up tents but about a discovery that only happens to people with blogs.  We found the original hardwood under the dirty old 70s' rug!! Whenever I read about some blogger or watched a DIY T.V. show about homeowners pulling back the carpets to find the original hardwood I thought WHO THE HELL does that really happen to?!?! Well this time it's me!!! Sorry to gloat but do you know how much money this saves us!? When we bought the house we knew there was the original school flooring in the main room but we didn't know it was hiding under the nasty carpet in the whole main floor!! Boo ya!


I'll tell you how the best day in my life happened...I was painting the ceiling in the spare room when I happened to look down and saw a little piece of brown peeking at me through the closet door floor hardware.  I immediately got down on my knees and started peeling up the carpet in the closet.  It was wood........a lot of enthusiastic screaming followed by Mr.Loonie asking WTF was going on. He couldn't believe it either! We then went to every bedroom closet to reveal more glorious wood!!


Now the wood is not in pristine condition so it will need to be refinished, I'm not sure yet how much this will cost us but I know it is a heck of a lot less than new hardwood! 
The carpet is now serving as a drop cloth when painting the walls and ceiling.  As painting is completed in each room we are removing the carpet and painstakingly removing the nails and staples and washing dripped stucco and years of dust. There are paint and other stains remaining but should be easily sanded out in the refinishing process.  Time to start calling specialists for quotes! 

Pictures below are taken in Penny's Room.


Thursday, June 6, 2013

Hanging Lantern Update

My friend introduced me to the Habitat for Humanity Restores in the Edmonton area and now Mr.Loonie and I are obsessed.  The jist of how it works is people drop off their unwanted home decor items such as furniture and lighting and also home renovation material like doors, tile, toilets, you name it.  It was pretty amazing actually, we know it will be our first stop when thinking of replacing anything in our house.  They literally have hundreds of interior doors that are in awesome condition.  Anyways....the point of this post is the awesome lantern style pendants I found for $15 each for the two larger ones and $5 for the smaller.  A few days prior, I was browsing for a similar style light on the Home Depot website but they were all over $200! When I saw these lights hanging there in all their glory I was so excited, I had to have them.  


In between the time we moved out of our Fort McMurray house and into our new home, we were staying with my in-laws with not a lot to do so it was a perfect time to fart around on little projects such as this....tedious taping.  It's always awesome having extra help too.  


The plan was simple.  Tape off the inside windows (they were soldered in) and then spray paint black even the cord and the chain.I decided it was too difficult to paint inside the lights but the gold lines inside give kind of a vintagey shimmery look when hanging and light. On the largest one hanging in the entry I did paint the inside light pole by hand with black paint which were unlike the other 2 where the bulbs were flush with the top.


We were in the new house when it finally came time to spray.


Remove the tape and hang.  We had to shorten in the chain in both the hall and entry.


Please excuse the crappy picture but I don't want to give away the entry or hallway reveal, which will be coming soon!

Friday, March 15, 2013

Bathroom Reno Reveal!

Once again I was in a love-hate relationship with this damn blog.  I must have been a deep hate because I am so proud of the bathroom renovation....you would think I would want to share it with you all.  I was even avoiding clicking on the "Two Loonies and a Penny" bookmark in my tool bar until a fellow blogging friend who I play volleyball with asked if we had even finished the bathroom since there were no pictures up.  So Lace, here ya go...thanks for the kick in the ass. It has been at least a month now we have been done.  It really was the longest bathroom reno of all time....about 9 months! But with babies and shift work, things get put off pretty easily.  So first let's have a look at the nasty before...

Blue counter tops, peach tile, green walls and white, blue and pink linoleum....YIKES.


And this was my inspiration picture.....


And now for the reveal.....


We finished tiling in November with the help of my Dad. I love the white hexagon tile with the lightest grey grout.  I realized that I LOVE WHITE! If we ever move (foreshadowing) I am seriously considering whiting out the whole house, by that I mean every. single. wall, WHITE! There are three rooms in our house which are painted a shade of white; the kitchen, Penny's room and this bathroom (which is mostly white) and they are all my favorite rooms in the house.  Nothing beats the cleanness of it. The dark greyish blue color we chose to compliment all the white is "grilled sardine" by Benjamin Moore.


The next step of the reno after tiling was the wainscoting and trim which Mr.Loonie completed effortlessly.  I really am so proud of him, it looks awesome.  Especially after I went behind him twice with the wood filler, silicone and white paint.  ;)


Then it was the accessories, the best part!! It could use a little more styling but I think that just comes with time.  I need to stroll through a vintage store or my Grandma's house to find a little tin or wall hanging for the wall opposite the towel ring, something to just give the bathroom that extra charm.  What we do have is an IKEA accordion mirror, storage boxes and white frames.  To add the needed punch of color I edited two corally colored flower photos that I took on our Oregon vacation.  The grey striped mat is from Crate and Barrel and the white waffle shower curtain and bathroom accessories (cup, toothbrush holder, soap dish, towel, garbage can) are from Superstore.  Hmmm....what else...toilet brush holder and shower rings from Home Sense; mirror from JYSK, cabinet hardware from Lee Valley and the rest I already owned (towel ring, and glass apothecary jars).
You also might be wondering what that silver thing is hanging off the toilet.  It's the cloth diaper sprayer where we spray out little Pen Pen's poop into the toilet.  At least with the toilet surrounded in white, if the poop splatters it is easy to spot and clean, keeps us extra diligent.


So that's it....all for under $4000. I don't have the exact bills in front of me but from what I can estimate we spent around $3500 so add a few hundred bucks for random items.
Approximate Expenditures: $1400 for tub, toilet  faucet and sink. $1000 for cabinet and countertop, $300 in tile and grout, $350 in paint, trim and wainscoting, $160 for lighting and $400 in accessories and finishing details.
What do you all think!?
To view all the bathroom posts while the reno was in progress click here.

Friday, January 11, 2013

No-Brainer: G.O.G


I saw this idea on Steven and Chris (Canadian talk show - my daily vice) a few days back and I had one of those "DUH, Why didn't I think of that??" moments.  It's just TOO simple that's why and I love to over complicate things! It's no secret that I'm kinda a cheapskate so the idea of buying minced garlic or ginger in the jar is out of question.  They are seriously way too expensive and most of the time lacking flavor and strength these aromatics possess.  When you make your own mixture, prepare to have your socks blown off or maybe burnt off by your dragon breath (Whoa oh..your socks are on fire!).  Holy Shitballs, it is strong. When Mr.Loonie came home last night from work and saw the concoction he had to have a try...he was a little surprised at G.O.G's power.  What's even funnier is Penny stuck her tongue in her daddy's mouth soon after and broke out into tears, maybe a little too strong for her tastes! The french kiss is her new thing...you try and give her a little smooch and she tries to slip ya the tongue.  Freaky lil' girl she is...takes after her mama I guess. ;)

So the recipe is simple, the chef on the show recommended 40/20/40:Ginger/Onion/Garlic but you could do it anyway you like.  With or without any of the three.  With all three it is the perfect combo and starting point for any Asian and Indian recipe.  As for the method, there is nothing to it.  All you need is a food processor or blender to puree your combo to whatever consistency you desire.  I didn't have to add any liquid but you may need to add a tablespoon or so just to get it all going.  You could use water, lemon/lime juice or maybe a vinegar   Another good thing to note is this mixture can be stored in the fridge in a non-reactive container such as glass for weeks without any worry of bacteria growth for a long time.  If you add oil, be careful as the storage time decreases significantly.

So stop wasting your money and make your own jar!!

Wednesday, January 9, 2013

Chalkboard Paint Everything!!

As any smart girl would do, I did whatever Ryan Gosling told me to (Isn't he the sexiest guy ever?  What is it about this guy?! He just oozes smooth).  No one has to tell me twice to chalk board paint something.  It has been quite a craze for awhile and I don't question why.  It is seriously the perfect solution for organizing and even without anything drawn on, it is the perfect shade of matte black 


My new chalk pens which were in my stocking this year also inspired me to get crafty.  They are awesome! They look like a paint pen and wipe off chalkboard super easy.  No more chalk dust, smudges and dry fingers.  And, finally we won't have to worry about rubbing the chalkboard wall at our back door, our jackets are always covered in pink and purple chalk....Mr.Loonie loves it. :/


So on a Monday night when Pen Pen was in bed, it was Mommy time to do some evening crafting.  I first covered a ceramic "biscotti" jar I received for Christmas.  Not exactly sure what I will use it for but it needed a makeover.  Maybe flour?


Next was a old digital frame gifted to all the employees at a company Christmas party, it had the company's logo stamped on the bottom...yuck.  Now I can write something cheesy like, "Memories".  We'll see....

**Ended up in the garbage! Haha Turned out it wasn't working**

Finally I covered a few mason jar lids just for labeling purposes.  We store our ground up beans and other essentials in a mason jars and keep them out in the open so I thought it would be cute.


What do you Chalkboard paint?

Tuesday, November 20, 2012

Kitchen Backsplash

Sorry to keep all of you in suspense! I am the worst blogger ever.  Some weeks I am so interested in keeping this up and others, I just want nothing to do with it....this has been one of those weeks.  Just in a bit of a funk...Mr. Loonie is almost at the end of a long work cycle, it has been cold, snowy and windy and we are still going through the sleep issues with Penny.  I honestly had no idea of the internal struggles I would be having deciding on what type of parent I want/should be.  The amount of information out there in books, blogs, forums, mom's groups, etc. is overwhelming, it honestly makes my head spin. Just when I think I want to do things one way, someone throws their opinion at me and it makes me second guess myself. I then do endless research weighing the pros and cons of both sides but always end up going back to my original method, what feels natural to me.   Whoa....a little off topic, just getting things off my chest I guess!  My rant deserves a post of it's own I think.  So, back to tile.....

We are super pleased with the end result, the kitchen feels much more bright and updated. And remember the tile only cost us a dollar a sheet. So in total we used 27 sheets therefore $27!! Mr. Loonie has asked me like ten times since we finished, "So, are you happy with your kitchen?".  It's hilarious, he is just that happy with himself! I have to say I am pretty proud of us too, I feel like we could tile anything now.  It took us just over three hours which is a little long probably but trying to keep Penny entertained at the same time was a handful. We added water to the mortar a few times since it was drying out.  The next few days included grouting (we went with a white grout), wiping and sealing and then cleaning.  

Wondering why there is one dark handle and the rest brushed nickel?  I'm just trying one out before I change them all.  Let me know what you think? All dark (oil rubbed bronze) or all brushed nickel, a different style though?? HELP ME! I can't decide!!


Friday, November 9, 2012

The Weekend of Tiling

The grout is a flyin' this weekend......finally! Well finally for the bathroom anyways.  We started the bathroom reno May long weekend with a little progress made in the summer but has been at a stand still now for which seems like forever.  So here we are in November getting this bathroom finished up! My Dad and Mr.Loonie are up there now laying it down while I get the kitchen blacksplash prepped and hangin' with little Pens of course. 

Bathroom Sneak Peek!

Yes, we are also tiling the kitchen back splash...something I never really planned on doing but when a deal came up at Wal-Mart for this glass mosaic tile pictured below, I couldn't refuse.  You are not going to believe me when I say this but a box, one 1ft x 1ft sheet was on the clearance rack for $1.00! One frekin dollar for real glass mosaic tile and it matches our colour scheme perfectly!! I saw almost the exact same sheet of tile at Home Hardware for $19.99.  We picked up 32 sheets which means we will be tiling the backsplash for $32.00 not including the cost of grout though.  The colour is called "ocean mist", found on the Creative Surfaces website.

Floor Tile, Countertop, Backsplash $1.00 tile!
Check out the before shot below. Yeesh, I could have at least put the dishes away and folded up the tea towel neatly before taking the shot.  Oh well, just keeping it real around here.  You can see one box of tile leaned up against the wall behind the sink, doesn't it just seem too perfect? I think so! Once the backsplash is done I am thinking of replacing the cabinet hardware as well.  The current handles are just a little too modern for me.  I picked them out five years ago while we were painting the cabinets but my style has changed over the years to a little more traditional/eclectic. I think that's how it would be described. Well, I must get back to work before the guys yell at me for being a slacker! haha


Stay tuned for the finished shots!!

Wednesday, October 31, 2012

Halloween Round-Up 2012

Halloween was pretty quiet around here this year.  Mr.Loonie is on night shift so I was in charge of handing out candy but I didn't have to do it alone this year! Penny the owl was there to join me. Instead of buying a $20 costume Penny could wear only once we went the homemade route instead which is usually much cuter anyways. I started with an owl toque my aunt got Penny and then sorta copied the idea for the body from a picture I found on Pinterest.  It cost me a total of $5 for a pack of craft felt from Wal-Mart. I just cut it into into strips (scalloped on one side and straight on the other) and hot glued them onto a black onesie I already had.  We also already had the black leggings. Super easy, cheap and cute!!

And then there's carving the pumpkins....I always think it will be a fun activity but the pumpkins usually sit uncarved until the night before Halloween.  Mr.Loonie thinks it's hilarious to do something out of the ordinary.  Last year was the unamused face and this year he used a pumpkin already shaped like a bum to carve out hands and an asshole....we did have quite the reaction at the door though. I used star shaped metal cookie cutters and hammered them into my pumpkin.  I went this route because I honestly hate following those paper patterns and any type of precision cutting. 
Penny's 1st Halloween!
Ass Sphincter Says What?                                                                     Tissue Paper Lanterns
The lanterns I did last year, I think my first ever pinterest project! They are just some random glass jars with tissue paper modge podged on and light up with tea lights.

 Oooh and what do you get from carving pumpkins?! The seeds!! This year we went all fancy up in here using olive oil, black truffle salt (love The Silk Road Spice Merchant!) and black pepper.  All earthy and delicious.


My Dad's birthday falls only a few days before Halloween and this year I volunteered to do the cake...a HALLOWEEN cake! It was actually a cake shaped like a pumpkin using two bundt cake pans and boxed cake mix dyed three different halloweeny colours and layered to bake.  Yet another idea from Pinterest....just no originality here folks.

Saturday, October 27, 2012

Chalkboard Update - Frame Drawings

I am always trying to think of something cool and creative to fill up my chalkboard with like meaningful quotes written in unique lettering but I just end up with phone messages and stick drawings.  I did a quick search on Pinterest and found this easy frame idea that I could personalize anyway I want including the frame design and what to fill them with.  Since Halloween is just around the corner I did a jack o'lantern and then countdown to Christmas in another frame to keep us on track for gift shopping (I can't believe it's only 8 weeks away!!).  The rest of the frames were easy...a K for our last name and then love for my babes. 

What I wish I could do....


Tuesday, August 14, 2012

Cleaning the Microfiber Sofas

Look at those before pictures, pretty gross right? Well that is what our microfiber sofa looked like after 4 years of wear.  I have done some light spot scrubbing with a wet rag before but never a serious clean.  I kept seeing a pin on Pinterest popping up on how to clean a microfiber couch with isopropynol, sounds risky doesn't it?  I thought so, but after Penny was born I got desperate, I did not want her lying on this nasty couch of ours.  The pin linked to this blog.

While Penny was settled in her crib for a long nap, I quickly got to work since the blog warned that  the odour can be pretty intense but it doesn't linger long. So I just followed the instructions using a clean white sponge, isopropynol in a spray bottle and clean white bristle brush.  Oh, and I won't forget my hulk arm, holy shit..do you ever have to scrub long and hard.  This job was not easy, I was sweating up a storm.  I needed to take a few breaks to catch a breather from both the smell and the pain I was in!! 
The area which was really tough was the seams, I still don't think it came out perfect but still a whole lot better than it was.

BEFORE:


After spraying and scrubbing, the areas still look wet but they dry up quick (which is the reason behind the isopropynol and not water).  After it dries, it's time for the bristle brush to smooth out and blend the areas which were cleaned.  I am not 100% satisfied with this method but it works good enough without paying for a steam cleaner, which I am not even sure would work.  I am already planning on doing another spot cleaning where Penny has had a few spit ups.

AFTER:


Make sure to refer to the original blog linked for the step by step procedure and FAQs.

Tuesday, June 5, 2012

Main Floor Half Bath Makeover

The first main half bath makeover was courtesy of moi, hence the horrible job.  The first paint colour (mustardy colour where mirror used to be), was painted when the main floor was painted (the main floor is still the same colour - and I like it).  It never looked good and it was just too much of the same colour on one floor so one evening a few years back I picked out a blue and went to town.  I can't believe I was lazy enough to paint around the mirror especially because it was only held into place by a few clips.  It is hard to tell from the pics but the walls were in AWFUL shape, there were holes and rough spots from old hooks, pictures and shelves, and a poor patch job of a door handle hole.

After I painted the bathroom blue, we changed the light fixture, the sink, faucet and the cabinet counter top to the same pattern/colour we chose to replace the old kitchen counter tops with. The silicone line at the top of the bathroom counter top was half the reason to paint, it was....what's another word for awful?!

I decorated with IKEA art, and a shelf above the toilet holding spray painted candles, Mr. Loonie thought this was ridiculous and would not let me live it down!  It was time for a change!! Check out the before shots........


Look at the extreme amount of mudding Mr. Loonie did to smooth out the walls!!


So.....I have to admit my mistake just to keep it real.  At first I chose Benjamin Moore's Bone, I painted one coat and almost vomited.  I thought a neutral colour would freshen the small space up, but nope, it turned out to be a yellow, pukey, depressing shade of shit.


Does this paint chip look the same colour as the walls below? NOOOO! WTF?!


Round 2: Second colour chosen was another Benjamin Moore colour, Bayou Marsh.  I have to say BM's Origin line newly available at Canadian Tire is a little pricey (approx. $50/gallon) but totally worth it.  It is the most smoothest and thickest paint I have ever used. The coverage after one coat was amazing, I just did two for good measure. 


This colour is fairly similar to the original blue but with a tinge of green in it.  Definitely a marshy shade.  So, I am loving the outcome, everything looks so fresh! I also repainted all the trim and baseboards to help clean things up.


For accessories...I used an antique mirror, stolen from another wall in the house and basket's screwed to the wall for storage.  Under the sink is where we store all the cleaning supplies, so we needed a place for toilet paper and toiletries used to freshen up when we're too lazy to run up stairs.


For the art, I printed off free botanical prints using the website provided by this blog and used some old frames I had purchased years ago from Michael's.  


All in all, this update cost $130 but should have been $80. $100 for two cans of paint (my stupid mistake).  And, $30 for the set of 3 nesting baskets (the third largest basket will be used in Penny's room for the change table).